Advanced pfSense Configuration Guide
Welcome to the advanced guide for pfSense configuration. This comprehensive resource will explore advanced features and configurations of pfSense, helping you create a robust and secure network environment.
1. Advanced Firewall Configurations
1.1 Implementing Floating Rules
Floating rules in pfSense allow you to create firewall rules that apply to multiple interfaces:
Firewall -> Rules -> Floating
Add a new rule:
Action: Pass
Interface: Multiple (WAN, LAN)
Protocol: TCP
Source: Any
Destination: LAN net
Destination Port Range: HTTPS
Description: Allow HTTPS from WAN to LAN
1.2 Setting Up Aliases for Dynamic Lists
Create aliases to manage groups of IPs or ports efficiently:
Firewall -> Aliases -> IP Aliases
Add a new alias:
Name: malicious_ips
Type: URL Table (IPs)
URL: https://lists.blocklist.de/lists/all.txt
Update Frequency: 1 day
2. Advanced VPN Configurations
2.1 Setting Up an IPsec Site-to-Site VPN
Configure a secure site-to-site VPN using IPsec:
VPN -> IPsec -> Tunnels
Add P1:
Remote Gateway: [Remote pfSense IP]
Authentication Method: Mutual PSK
My identifier: My WAN IP
Peer identifier: Peer WAN IP
Pre-Shared Key: [Your secure key]

Add P2:
Local Network: LAN subnet
Remote Network: Remote LAN subnet
2.2 Implementing OpenVPN with Two-Factor Authentication
Enhance OpenVPN security with 2FA:
System -> User Manager
Edit user, enable Google Authenticator

VPN -> OpenVPN -> Servers
Edit server, under "Advanced Options":
Auth Mode: Local Database + Google Authenticator
3. Advanced Routing Techniques
3.1 Configuring Policy-Based Routing
Set up policy-based routing for specific traffic:
System -> Routing
Enable "Gateway Groups"

Create a gateway group:
Name: LoadBalanced
Tier 1: WAN_DHCP, WAN2_DHCP

Firewall -> Rules
Add a new rule on LAN interface:
Protocol: TCP/UDP
Source: LAN net
Destination: Any
Advanced Features:
  Gateway: LoadBalanced
3.2 Implementing OSPF for Dynamic Routing
Configure OSPF for larger networks:
System -> Package Manager
Install package: FRR

Services -> FRR OSPF
Enable OSPF
Add networks to be advertised
Configure OSPF interfaces
4. Advanced Traffic Shaping and QoS
4.1 Implementing HFSC (Hierarchical Fair Service Curve)
Set up advanced QoS using HFSC:
Firewall -> Traffic Shaper
Interface: WAN
Scheduler: HFSC
Queues:
  - VoIP (Priority: 1, Bandwidth: 20%)
  - Web Browsing (Priority: 2, Bandwidth: 40%)
  - Default (Priority: 3, Bandwidth: 40%)
4.2 Limiting Bandwidth for Specific Applications
Create rules to limit bandwidth for specific applications:
Firewall -> Rules
Add new rule:
Protocol: TCP
Destination port: 1935 (for example, Flash video)
Advanced Options:
  In/Out pipe: Select appropriate limiter
5. Advanced Monitoring and Reporting
5.1 Configuring Netflow for Traffic Analysis
Set up Netflow for detailed traffic analysis:
Diagnostics -> Netflow
Enable Netflow
Destination IP: [Your Netflow collector IP]
Destination Port: 2055
5.2 Implementing SNMP for Network Monitoring
Configure SNMP for integration with monitoring systems:
Services -> SNMP
Enable SNMP
Community String: [Your secure string]
SNMP Trap Server: [Your SNMP server IP]
Important Note:
Always test configurations in a controlled environment before deploying to production.
Incorrect configurations can lead to network instability or security vulnerabilities.
Regularly backup your pfSense configuration before making significant changes.
pfSense Command Reference Table
| Command |
Description |
pfSsh.php |
Access pfSense PHP shell |
pfctl -s state |
Display firewall state table |
tcpdump -i igb0 -n |
Capture traffic on igb0 interface |
ping -c 4 8.8.8.8 |
Test connectivity to Google DNS |
netstat -r |
Display routing table |
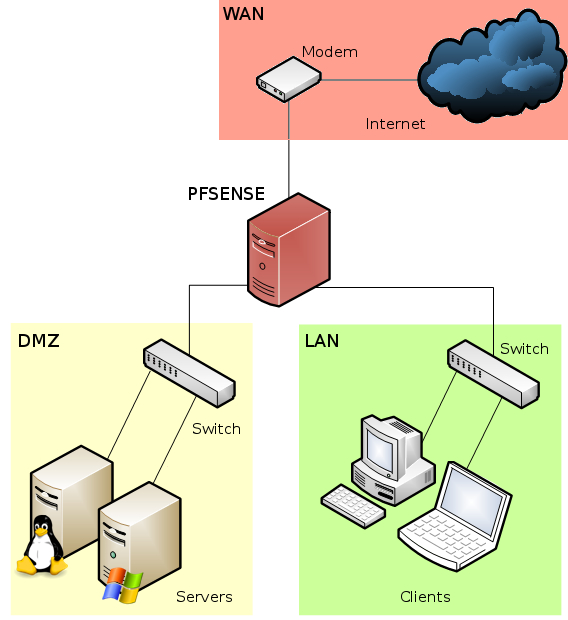
pfSense Network Diagram showing WAN, LAN, and DMZ setup
Explore our other advanced networking guides: